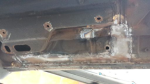
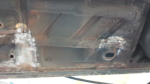
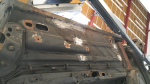
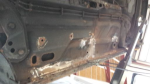
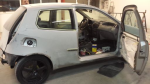
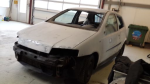
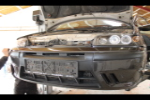
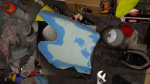
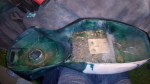
Posted: 05 maj 2017 by Daniel Back in 2013, my car got sideswiped by a metal post cage.
Settled on a cash amount for repairs, but decided I wanted to do a complete paintjob, and paid the rest out of pocket.
Not to mention doing alot of prep work

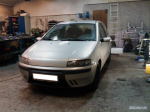

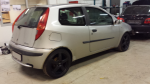

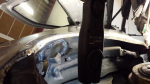
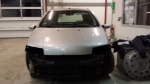
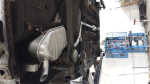
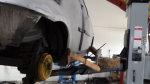

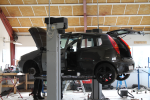

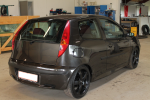
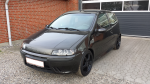 The car ended up lasting only another two years, it was a 2000 jtd model. I sold it and bought a Honda. Other mods included lightended flywheel and a rolling road remap.
|
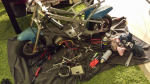
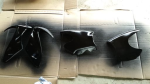
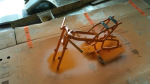
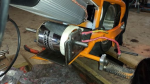
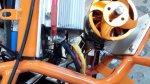
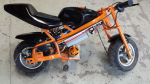
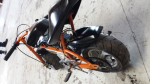
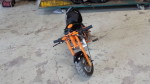
Posted: 25 jan 2016 by Daniel At some point I decided that having the motor on my bicycle was too much of a hassle. And charging LiPo's is a pain if you don't have the proper charger.
I pulled the motor and ordered a new controller, better suited for high AMPs. Below is the process, mainly in pictures, how I created the thing.
Stripping
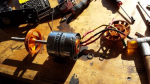
 Motor bearing replacement
 Sanding


 Fixing cracks
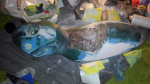
 Painting
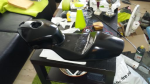


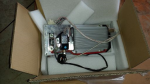
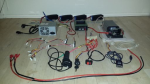
 Controller arrives
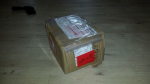
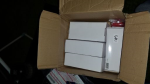
 Batteries arrive
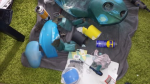
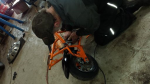
 Assembly
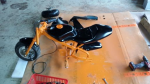


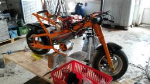
 Ready
Ready
|
Posted: 21 aug 2014 by Daniel So I bought myself a tablet, to use with my USB Alfa AWUS036H.
I went with a Samsung Galaxy Tab3 10.1" Wifi 32GB (GT-P5210)
Alright, time to root, use my AWUS036H with an OTG cable and boot into KALI Linux for ARM right?
WRONG
It's not an ARM, but an x86 Intel atom Z2760 processor
There are no rt8187 drivers for the x86 stock kernel
Because it's not an ARM processor, third party development is virtually non-existant
Here's the link to XDA GTab3 Forum
And this is the link where I initially posted my creation
After searching the web it became obvious that I had to take it upon myself to build a custom kernel.
Bearing in mind I have never compiled a kernel before.
Down the rabbit hole we go
We need a compiler (A cross compiler tool chain you say?)
We need a kernel source
We need a rom to go with the kernel
#Choose environment
If you want to start from scratch this is where you go Android ASOP Source Initialization
or if you don't feel like setting up the environment go get Builduntu Virtual Box from XDA Dev sylentprofet
I went with Virtual Box and Builduntu, all ready to check out a branch.
After you download the kernel source code (I went with version MI8 to fit the ROM) for the GT-P5210 you can extract README_Kernel.txt
This will tell you which toolchain you need for compilation: JDQ39, android-4.2.2_r1.
#Checkout toolchain
Boot virtual box, open a terminal, and enter the following to check out the proper toolchain.
(sudo password is 'android')
mkdir /home/android/WRKDIR_P52XX/
cd /home/android/WRKDIR_P52XX/
git config --global user.name "Name"
git config --global user.email "email@mail.com"
repo init -u https://android.googlesource.com/platform/manifest -b android-4.2.2_r1
repo sync -j8
It will now download the required files for the compiler into our WRKDIR_P52XX folder.
Meanwhile, you can extract the Kernel Source Kernel.tar.gz into WRKDIR_KRLSRC
#Switch directory to kernel source
cd ..
cd WRKDIR_KRLSRC
#Edit the makefile
You must set the toolchain path (to the one we just downloaded), and verify the other settings
ARCH ?= i386
CROSS_COMPILE ?= /home/android/WRKDIR_P52XX/prebuilts/gcc/linux-x86/x86/i686-linux-android-4.6/bin/i686-linux-android-
ANDROID_TOOLCHAIN_FLAGS ?= -mno-android
You probably also want to remove -Werror flags from the makefile, otherwise default option is to exit on compile warnings
#Configure
#Set the default config for GT-P5210
make ARCH=i386 android_santos10_open_r00_user_defconfig
#Customize kernel config
make ARCH=i386 menuconfig
You need to enable mac80211 support
Networking Support > Wireless >[*] Generic IEEE 802.11 Networking Stack (mac80211)
and rt8187 drivers
Device Drivers > Network Device Support > Wireless LAN >[*] Realtek 8187 and 8187B USB support
Select with [*] (press 'Y') to build internal modules
Press escape until it asks you if you want to save changes, press 'Y'
 #Build Kernel and Modules
make ARCH=i386 all
Kernel image will be in /home/android/WRKDIR_KRLSRC/arch/x86/boot/bzImage
That bzImage has to be inserted into a boot.img (or you can specifically flash your bootloader manually)
Pete's blog has an excellent guide on how to do this, he even created a tool to ease the process.
#Clone bootimg-tools
git clone https://android.googlesource.com/platform/system/core /home/android/bootimg-tools
cd /home/android/bootimg-tools/libmincryp
gcc -c *.c -I../include
ar rcs libmincrypt.a *.o
cd ../mkbootimg
gcc mkbootimg.c -o mkbootimg -I../include ../libmincrypt/libmincrypt.a
cp mkbootimg /usr/local/bin/
cd ../cpio
gcc mkbootfs.c -o mkbootfs -I../include
cp mkbootfs /usr/local/bin/
#Install Pete's unpack tool
cd /home/android/bootimg-tools/mkbootimg/
wget https://raw.github.com/pbatard/bootimg-tools/master/mkbootimg/unmkbootimg.c
gcc -o unmkbootimg unmkbootimg.c
cp unmkbootimg /usr/local/bin/
#Create Boot.img
Now I copied the boot.img to /home/android/WRKDIR_BOOT/ from the P5210UEUAMI8.zip rom we found on XDA (by Mod57)
cd /home/android/WRKDIR_BOOT/
unmkbootimg -i boot.img
This will extract the boot.img into its parts.
It also will spit out the command you need to rebuild the image, save that for later.
Copy /home/android/WRKDIR_KRLSRC/arch/x86/bzImage to /home/android/WRKDIR_BOOT/bzImage
Change the parameters of the rebuild command you saved and change
--kernel bzImage
--ramdisk ramdisk.cpio.gz
-o boot-MI8.img
ex. (PLESE DO NOT USE, this is an example cmd, your offsets may vary, unless you need bricks for a house , I cant recommend it.)
To rebuild this boot image, you can use the command:
mkbootimg --base 0 --pagesize 2048 --kernel_offset 0x10008000 --ramdisk_offset 0x11000000 --second_offset 0x10f00000 --tags_offset 0x10000100 --cmdline 'init=/init pci=noearly console=ttyS0 console=logk0 earlyprintk=nologger loglevel=4 hsu_dma=7 kmemleak=off androidboot.bootmedia=sdcard androidboot.hardware=santos10wifi androidboot.spid=xxxx:xxxx:xxxx:xxxx:xxxx:xxxx androidboot.serialno=01234567890123456789012345678901 ip=50.0.0.2:50.0.0.1::255.255.255.0::usb0:on vmalloc=172M' --kernel bzImage --ramdisk ramdisk.cpio.gz -o boot-MI8.img
#Create ROM zip
Delete the extracted boot.img
Copy and rename boot-MI8.img to boot.img and overwrite the one we extracted from the P5210UEUAMI8.zip
Replace the boot.img in P5210UEUAMI8.zip with our new custom one.
(FYI: Install TWRP recovery)
#Flash ROM
Put the modified rom onto the sdcard
Go to recovery
Wipe Cache and dalvik-cache
Install the ROM zip
Reboot and enjoy
That's cool, how do I get aircrack-ng?
Notice, when you use your USB device, you must disable the internal WIFI, otherwise crashes happen.
This will work by chroot'ing into another distribution (ubuntu) made for x86 tablets.
Download this image: ubuntu-13.10.LARGE.x86.ext2.v1.zip
from http://sourceforge.net/projects/linuxonandroid/files/Ubuntu/13.10/x86/
and copy it to your sdcard
Thanks to jorgen_gustavsson for his excellent work http://forum.xda-developers.com/show....php?t=2573441
1. Install/Update busybox
2. Install a vnc viewer
3. Install linux on android (open and close it once to be safe)
4. Copy bootscript.sh link to bootscript thread to /data/data/com.zpwebsites.linuxonandroid/files/ overwrite the old file.
bootscript.sh
(Thanks to xdadev: jorgen_gustavsson)
5. Unpack and Copy the ubuntu-13.10.LARGE.x86.ext2.img and .md5 to a place of your choosing on either internal or external sdcard.
6. Make a Linux on Android widget and point it to the img file you copied to your sdcard (ubuntu-13.10.LARGE.x86.ext2.v1.img).
7. Now click on the LOA widget you made in 6 and let linux ”bootup”
8. Press 'y' to check MD5 checksum
9. Connect vnc to localhost:5900 password ubuntu
Now to install Aircrack
# Libraries
sudo updatedb
sudo apt-get install build-essential
sudo apt-get install gcc
sudo apt-get install zlibg-dev
sudo apt-get install libssl-dev (or libssl-dev depending on your distribution)
#airolib-ng optional sqlite=true
sudo apt-get install libsqlite3-devel
#libnl optional libnl=true
sudo apt-get install libnl-genl-3-dev libnl-3-dev
#Required Extras
sudo apt-get install wireless-tools
sudo apt-get install net-tools
sudo apt-get install wicd-curses (or wicd-cli)
sudo apt-get install usbutils
sudo apt-get install wpasupplicant
sudo apt-get install dbus
# Download & unpack (or replace link with latest trunk)
wget http://download.aircrack-ng.org/airc...2-beta3.tar.gz
tar -zxvf aircrack-ng-1.2-beta3.tar.gz
cd aircrack-ng-1.2-beta3
# Make
sudo make libnl=false sqlite=false
sudo make install libnl=false sqlite=false
# or
make libnl=true;make libnl=true install
make install libnl=true;make libnl=true install
# or Airolib-ng support
make sqlite=true;make sqlite=true install
make install sqlite=true;make sqlite=true install
# Add binaries to path
export PATH=$PATH:/usr/local/sbin
# add the above line to below file for include path on startup
vim /home/ubuntu/.bashrc
# Update MAC OUI
airodump-ng-oui-update
Reboot your tablet, disable the internal wifi, connect your dongle, and get cracking.
#Build Kernel and Modules
make ARCH=i386 all
Kernel image will be in /home/android/WRKDIR_KRLSRC/arch/x86/boot/bzImage
That bzImage has to be inserted into a boot.img (or you can specifically flash your bootloader manually)
Pete's blog has an excellent guide on how to do this, he even created a tool to ease the process.
#Clone bootimg-tools
git clone https://android.googlesource.com/platform/system/core /home/android/bootimg-tools
cd /home/android/bootimg-tools/libmincryp
gcc -c *.c -I../include
ar rcs libmincrypt.a *.o
cd ../mkbootimg
gcc mkbootimg.c -o mkbootimg -I../include ../libmincrypt/libmincrypt.a
cp mkbootimg /usr/local/bin/
cd ../cpio
gcc mkbootfs.c -o mkbootfs -I../include
cp mkbootfs /usr/local/bin/
#Install Pete's unpack tool
cd /home/android/bootimg-tools/mkbootimg/
wget https://raw.github.com/pbatard/bootimg-tools/master/mkbootimg/unmkbootimg.c
gcc -o unmkbootimg unmkbootimg.c
cp unmkbootimg /usr/local/bin/
#Create Boot.img
Now I copied the boot.img to /home/android/WRKDIR_BOOT/ from the P5210UEUAMI8.zip rom we found on XDA (by Mod57)
cd /home/android/WRKDIR_BOOT/
unmkbootimg -i boot.img
This will extract the boot.img into its parts.
It also will spit out the command you need to rebuild the image, save that for later.
Copy /home/android/WRKDIR_KRLSRC/arch/x86/bzImage to /home/android/WRKDIR_BOOT/bzImage
Change the parameters of the rebuild command you saved and change
--kernel bzImage
--ramdisk ramdisk.cpio.gz
-o boot-MI8.img
ex. (PLESE DO NOT USE, this is an example cmd, your offsets may vary, unless you need bricks for a house , I cant recommend it.)
To rebuild this boot image, you can use the command:
mkbootimg --base 0 --pagesize 2048 --kernel_offset 0x10008000 --ramdisk_offset 0x11000000 --second_offset 0x10f00000 --tags_offset 0x10000100 --cmdline 'init=/init pci=noearly console=ttyS0 console=logk0 earlyprintk=nologger loglevel=4 hsu_dma=7 kmemleak=off androidboot.bootmedia=sdcard androidboot.hardware=santos10wifi androidboot.spid=xxxx:xxxx:xxxx:xxxx:xxxx:xxxx androidboot.serialno=01234567890123456789012345678901 ip=50.0.0.2:50.0.0.1::255.255.255.0::usb0:on vmalloc=172M' --kernel bzImage --ramdisk ramdisk.cpio.gz -o boot-MI8.img
#Create ROM zip
Delete the extracted boot.img
Copy and rename boot-MI8.img to boot.img and overwrite the one we extracted from the P5210UEUAMI8.zip
Replace the boot.img in P5210UEUAMI8.zip with our new custom one.
(FYI: Install TWRP recovery)
#Flash ROM
Put the modified rom onto the sdcard
Go to recovery
Wipe Cache and dalvik-cache
Install the ROM zip
Reboot and enjoy
That's cool, how do I get aircrack-ng?
Notice, when you use your USB device, you must disable the internal WIFI, otherwise crashes happen.
This will work by chroot'ing into another distribution (ubuntu) made for x86 tablets.
Download this image: ubuntu-13.10.LARGE.x86.ext2.v1.zip
from http://sourceforge.net/projects/linuxonandroid/files/Ubuntu/13.10/x86/
and copy it to your sdcard
Thanks to jorgen_gustavsson for his excellent work http://forum.xda-developers.com/show....php?t=2573441
1. Install/Update busybox
2. Install a vnc viewer
3. Install linux on android (open and close it once to be safe)
4. Copy bootscript.sh link to bootscript thread to /data/data/com.zpwebsites.linuxonandroid/files/ overwrite the old file.
bootscript.sh
(Thanks to xdadev: jorgen_gustavsson)
5. Unpack and Copy the ubuntu-13.10.LARGE.x86.ext2.img and .md5 to a place of your choosing on either internal or external sdcard.
6. Make a Linux on Android widget and point it to the img file you copied to your sdcard (ubuntu-13.10.LARGE.x86.ext2.v1.img).
7. Now click on the LOA widget you made in 6 and let linux ”bootup”
8. Press 'y' to check MD5 checksum
9. Connect vnc to localhost:5900 password ubuntu
Now to install Aircrack
# Libraries
sudo updatedb
sudo apt-get install build-essential
sudo apt-get install gcc
sudo apt-get install zlibg-dev
sudo apt-get install libssl-dev (or libssl-dev depending on your distribution)
#airolib-ng optional sqlite=true
sudo apt-get install libsqlite3-devel
#libnl optional libnl=true
sudo apt-get install libnl-genl-3-dev libnl-3-dev
#Required Extras
sudo apt-get install wireless-tools
sudo apt-get install net-tools
sudo apt-get install wicd-curses (or wicd-cli)
sudo apt-get install usbutils
sudo apt-get install wpasupplicant
sudo apt-get install dbus
# Download & unpack (or replace link with latest trunk)
wget http://download.aircrack-ng.org/airc...2-beta3.tar.gz
tar -zxvf aircrack-ng-1.2-beta3.tar.gz
cd aircrack-ng-1.2-beta3
# Make
sudo make libnl=false sqlite=false
sudo make install libnl=false sqlite=false
# or
make libnl=true;make libnl=true install
make install libnl=true;make libnl=true install
# or Airolib-ng support
make sqlite=true;make sqlite=true install
make install sqlite=true;make sqlite=true install
# Add binaries to path
export PATH=$PATH:/usr/local/sbin
# add the above line to below file for include path on startup
vim /home/ubuntu/.bashrc
# Update MAC OUI
airodump-ng-oui-update
Reboot your tablet, disable the internal wifi, connect your dongle, and get cracking.
 Sources:
XDA:
http://forum.xda-developers.com/showthread.php?t=2573441 [T3buntu]
http://forum.xda-developers.com/showthread.php?t=2338179 [[GUIDE] Use aircrack-ng on android phone using Wireless USB Adapter]
Pete's Blog:
http://pete.akeo.ie/2013/10/compiling-and-running-your-own-android.html
https://github.com/pbatard/bootimg-tools
Samsung opensource:
http://opensource.samsung.com/reception/receptionSub.do?method=sub&sub=F&searchValue=GT-P5210
Root:
http://nasirtech.blogspot.dk/2014/03/root-p5210xxuanb4-android-422-stock.html
Sources:
XDA:
http://forum.xda-developers.com/showthread.php?t=2573441 [T3buntu]
http://forum.xda-developers.com/showthread.php?t=2338179 [[GUIDE] Use aircrack-ng on android phone using Wireless USB Adapter]
Pete's Blog:
http://pete.akeo.ie/2013/10/compiling-and-running-your-own-android.html
https://github.com/pbatard/bootimg-tools
Samsung opensource:
http://opensource.samsung.com/reception/receptionSub.do?method=sub&sub=F&searchValue=GT-P5210
Root:
http://nasirtech.blogspot.dk/2014/03/root-p5210xxuanb4-android-422-stock.html
|
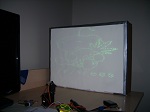
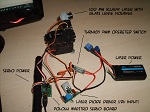
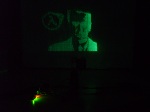
Posted: 07 apr 2011 by Daniel For some time I have been toying with a couple of servos and a bluray laser. The bluray laser wavelength of 405nm is ideal for activating glow materials.
So with a small amount of trigonometry I've created a laser plotter, that will draw an, almost, undistorted stencil on a glow in the dark painted background.
Materials:
Glow inc V10 green glow powder: http://glowinc.com/detail.aspx?ID=42 (I bought 1kg which was $160, you won't need this much)
Pololu Maestro Servo controller board: http://www.pololu.com/catalog/product/1350 $20, an excellent tiny servo controller board, provides C#.net support)
A couple of servo motors from www.hobbyking.com
and a servo signal operated on/off switch for the laser, also from Hobbyking http://www.hobbyking.com/hobbyking/store/uh_viewItem.asp?idProduct=8833

|
Posted: 27 feb 2011 by Daniel I've been playing with my Kinect sensor for about a month now, and I've created a simple bubble menu system (and a ton of different alterations) using WPF.NET C# and the OpenNI Kinect Driver and .NET wrapper.
Using HTML, CSS, and Javascript as a starting point for rendering, as different java libraries hold a ton of effects and functionality. Whenever the menu is supposed to be displayed, my WPF application sends javascript commands directly to the encapsulated browser.
Have a look:
|
Posted: 30 nov 2010 by Daniel 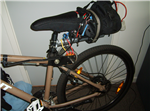 In the summer of 2010 I had the idea that I would build myself an electric bicycle.
With battery and motor technology maturing to a point where it would be feasible to build something that would actually get me to and from work and school without running out of juice.
I first looked at commercially ready products, 25 kph and 30km range pedal assist bicycles going for somewhere around 1000 Euro I came to the conclussion that I didn't have that kind of money for a joke like that.
So I built my own, and the result was a (including the brand new mountain bike) a 80 kph hour 25 km range LiPo battery powered brushless RC helicopter motor assisted mountain bike. This thing turns heads!
This is the very first testrun
|
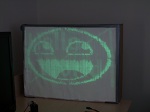
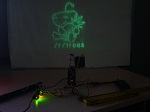
Posted: 30 nov 2010 by Daniel A project I am currently refining and about to complete, is a C# .NET servo controlled bluray laser.
This thing can paint an image on a glow in the dark wall, using a 405nm bluray laser and some quick programming.
Here is a work in progress video
Once completed it can paint any stencil image, text onto a wall that I have painted with glow in the dark paint.
|